■ Access to the MMBox, as described in MMBox Access
 How
How
1 Click Compose.
The Compose page appears (see Figure: Compose Page).
2 To add an image to the slide, under Image, do one of the following:
■
To add an image from the multimedia
albums, click  Load
Image From Album.
Load
Image From Album.
The Multimedia Album opens in a new window, showing the content in the Public Album by default.
Browse to the desired image in the Public or Private Albums, and then click OK to add it.
■
To add an image from your computer,
click  Load
Image from your Computer and browse to
the location of the image.
Load
Image from your Computer and browse to
the location of the image.
The name of the selected image appears in the field and the image itself appears in the slide.
3 To add a video clip to the slide, under Video, do one of the following:
■
To add a video clip from the
multimedia albums, click  Load Video From Album.
The Multimedia Album opens in a new window, showing the content in the Public Album by default.
Browse to the desired video clip in the Public or Private Albums, and then click OK to add it.
■
To add a video clip from your
computer, click Load
Image from your Computer and browse to
the location of the video clip.
The name of the selected video clip appears in the field and the clip itself appears in the slide.
4 To add an audio clip to the slide, under Audio, do one of the following:
■
To add an audio clip from the
multimedia albums, click  Load Audio From Album.
The Multimedia Album opens in a new window, showing the content in the Public Album by default.
Browse to the desired audio clip in the Public or Private Albums, and then click OK to add it.
■
To add an audio clip from your computer, click Load
Image from your Computer and browse to
the location of the audio clip .
The name of the selected audio clip appears in the field.
5
To remove an image, video clip, or audio clip from a
slide, under Image, Video or Audio, click  Remove image/video/audio from current slide.
6 (Optional) In the Text field, type the text to include in the slide.
7 To position the text above the video or image clip on the slide, click Text Above.
The default position for text on a slide is below the video or image clip.
8 To specify a delay before the media element appears on the slide, and the duration for which the media element remains on the slide, click Show advanced options.
Begin after and Duration time controls appear below each of the media elements, including the Text element (Figure: Advanced Time Controls for Slides).
Advanced Time Controls for Slides
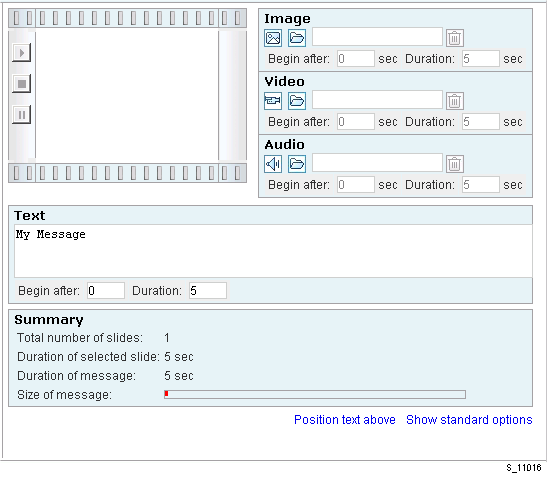
9 Do the following for the Image, Video, Audio, and Text media elements, as appropriate:
i In the Begin After field, type the number of seconds after which the media element must appear on the slide.
ii In the Duration field, type the length of time that the slide remains on the handset, in seconds.


